
Guide
- Bedding Procedure
- Instructions
- Maintenance
It is very important to follow proper brake bedding procedure following installation. This is necessary not only for optimum performance of the system, but also to avoid onset of judder (vibration felt through brake and steering). The discs are delivered with a thin zinc coating to prevent corrosion. Prior to beginning the bedding procedure, this plating must be removed from the braking surfaces by driving the car slowly (under 30mph) and performing very light brake applications in order to remove the plating without generating heat. With too much heat or pedal pressure, this plating can be deposited unevenly on the disc, and impregnated into the pad, further increasing the likelihood of judder development. Once a visual inspection of the braking surfaces confirms that the plating has been evenly removed, begin with the bedding procedure as specified below.
- Drive vehicle to a remote area and perform at least 30 brake applications of 3 second duration. Use light/medium deceleration with varying starting speeds. Leave at least 1/2 mile between each brake application
- The purpose of this procedure is to gradually increase the temperature in the components without thermal shock, and to mate the brake pad and disc friction surfaces
- After the repeated stops, drive the vehicle for several miles with little or no braking in order to adequately cool the components
- The system is now ready for normal use
NOTE: This entire procedure must be complete before driving the vehicle as normal. It is especially important that this process is completed before any extended same-speed driving is done (i.e. freeway travel). Failure to follow these instructions greatly increases the likelihood of judder development
NOTE: After installation or bleeding of the brake system, flush any brake fluid from around the bleed screws, etc, using soapy water. Over time, brake fluid trapped in these areas may cause paint damage. Additionally, do not use acidic wheel cleaners when washing your vehicle, as they can cause damage to the caliper finish and aluminum disc mounting bells, as well as to the wheels themselves. Use only soap and water when cleaning wheels or braking components.
Fitting Instructions
- Ensure that the disc reference number corresponds to the vehicle on which it is to be installed.
- Always replace the two discs on the same axle at the same time.
- Use two discs from the same pack (this will ensure that they are both from the same production batch).
- Read and scrupulously comply with the instructions for replacement of discs that are provided in the pack.
- Replace discs when they show deep scoring, uneven wear or when they have reached the minimum thickness.
- The minimum thickness value is impressed on every disc (for instance, MIN. TH 10 mm indicates a minimum thickness of 10 mm). It is also to be found in the Brembo catalogue. Generally speaking, a brake disc wears down after 2-3 changes of brake pads.
- Carefully clean the discs prior to installation; it is absolutely essential that there should be no traces of oil or grease on the braking surfaces. These could contaminate the brake pad friction material and negatively affect braking performance.
- Once the disc has been installed, use a DTI (Dial Test Indicator), fixed to the suspension strut, in order to measure the run-out of the disc on a braking surface near to the outer edge. The runout value after one complete turn of the wheel must not exceed 0.1 mm. If the value is greater, change the position of the disc in relation to the wheel hub (if the tightening hole allows) or install as above the second disc from the pack. If the disc is held in place by means of a single bolt, attach it to the wheel hub with two more bolts (using the wheel nuts with spacers corresponding to the thickness of the rims) in order to simulate the rotation conditions once the wheel has been fitted. Measurement of disc run-out is an extremely important operation: if run-out is excessive, in due course after a few thousand kilometers the disc may be affected by abnormal wear when the vehicle is not being braked (due to partial contact with the brake pads) and during braking there will be vibrations. The maximum tolerance for run-out once the disc has been installed as indicated by Brembo has been determined on the basis of experience. Certain manufacturers may indicate slightly different values. In such cases the original values should be followed.
- Advise a short running in period for new discs (about 200 Km); during this period a short, smooth braking action should be used so that the brake pad surfaces can adapt to the disc. Over sharp or heavy braking action could cause the brake pad friction material and disc to overheat and in time this would compromise the braking system as a whole and its performance.
- The brake disc and brake pad are important sources of information (state of surface, colour, appearance). Any change in the condition could indicate failure or wear of one or more parts of the axle (caliper, hub, bearings, etc.).
The pads and discs that are removed are an important source of information. For instance, the state of the disc must be observed carefully (state of braking surfaces, colour, profile). This examination can highlight faults in the functioning of one or more components (calipers, pads, bearings, etc.). It is important to resolve such problems before replacing the disc.
- Replacing a Disk
-
When do brake discs need to be replaced?
- When, during the course of a normal check, it is found that the discs thickness is less than or has reached the minimum thickness indicated on the outer rim of the disc itself (minimum thickness).
- When, while checking or replacing pads, cracks longer than 30 mm are found.
- When circular score marks are observed, deeper than 0.3-0.4 mm.
- When dark patches are found on the discs surface.
- When, after a check, measurements reveal distortion or noticeable variations in height between a number of points over the discs braking surfaces.
Lastly, before moving on to practical issues, we should bear in mind the following general rules:
- Instructions for the replacement of components should be read and scrupulously followed.
- Both discs on the same axle must be replaced on the same occasion.
- Make sure that the disc reference number corresponds to the vehicle on which it is to be installed. The same goes for the pads.
- Install two discs from the same pack (from the same production batch).
- Pads must always be replaced when discs are replaced.
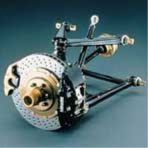
REPLACING A DISC DISMANTLING AND REFITTING
1. Remove the wheel.
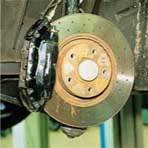
2. Remove the pads and push back the pistons using the proper tool for this operation.

3. Dismantle the complete caliper from its support, without disconnecting the brake fluid ducts. Do not leave the caliper hanging from the flexible ducts. Suspend the caliper in some way (for instance, on a hook).

4a. Dismantle only the used disc, if this has a mounting flange inside the carrier.
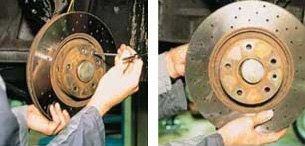
4b. If the mounting flange is external to the carrier then it will be necessary to first dismantle the hub and then the worn disc.
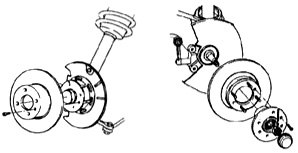
5. Clean the new disc with an appropriate solvent (for example, petrol or spirit). The anti-corrosion layer must be completely removed. The disc must not be contaminated by oil or grease as these substances could be passed on to the pads and so reduce their performance. Carefully clean the surface of the disc that will come into contact with the hub.
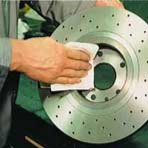
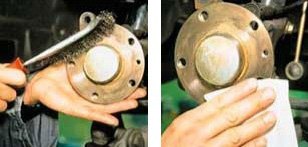
6. Carefully clean the surface of the wheel hub on which the disc will be installed. Eliminate rust and other deposits. Check that the support surface is neither distorted nor damaged.
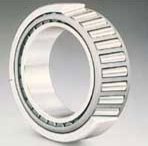
7. Check that play in the bearings does not exceed the tolerance and that the ball bearings rotate freely within their crown. If possible, adjust the bearing.
8. Fit the brake disc on the hub.
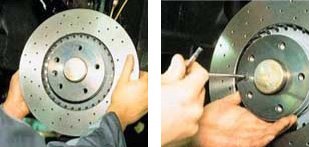
9. For discs with a mounting surface that is external to the carrier, fit the wheel hub and adjust the wheel bearing.
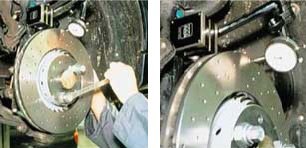
10. Once the disc has been fitted, use a DTI Gauge (fixed to the suspension bracket) to measure disc run out on a braking surface at the point of its external diameter. At the end of one complete rotation, run out should not exceed 0.10 mm. If it is greater, change the position of the disc on the hub (provided that the mounting aperture allows this), or fit the second disc from the pack. If the disc is held in place by one bolt only, secure it to the wheel hub by two other bolts (using wheel studs plus washers to compensate for the thickness of the wheel) in order to simulate rotation conditions once the wheel has been fitted.
Measurement of disc run out is a vitally important operation:
if there should be too much run out then in time, after a few thousand kilometers, the disc may be subject to abnormal wear when travelling - and outside of occasions when the brakes are applied (due to slight rubbing against the pads) - and braking vibrations may occur.
11. When the maximum recommended run out for the disc is exceeded then check run out for the bare hub. It should be borne in mind that the value recorded for the hub will double when measured at the outer diameter of the disc.
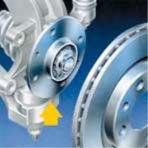
12. Fit the caliper to its support. A floating caliper must move smoothly and regularly along its guides. The pistons must move freely. Dust shields must be integral.
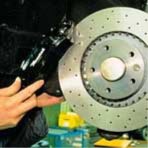
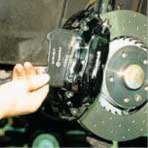
13. Fit the new pads - they must be free within their seats. Fit the springs and any other parts included in the kit.
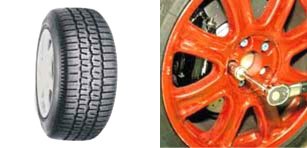
14. Before fitting the wheel make sure that the rims are not distorted.
Balance the wheel/tyre unit correctly. Tighten bolts in the correct sequence and observe the recommended torque.
15. Check that the elements comprising the suspension are integral. Check that the shock absorbers function properly. The suspension adjustment must correspond to the manufacturers recommended values.
TESTING AND RUNNING IN
Once the discs and pads have been replaced, the mechanic should then carry out a road test. He must ascertain that there are no brake vibrations or noises, either while travelling or during braking. He must also check that the braking action is both correct and efficient, even though the brakes are not yet run in. It is the braking distance that is important. Never brake sharply during these tests. The car user should be advised to observe an approximately 200 km running-in period. During this period a short, smooth braking action should be adopted so that the pads can align correctly to the disc surface. Too sharp or heavy braking may not only cause the pads friction material to overheat, but also the disc itself. This would end up by compromising brake integrity and performance. In particular, do not attempt to activate the ABS.
- Deterioration Due to Fitting the Disc
-
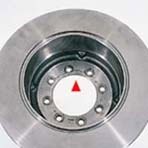
1. INCORRECT TIGHTENING
Description of defect: Formation of cracks on the carrier surface in contact with the hub. This is due to incorrect tightening during fitting. The tightening sequence has not been followed and torque is insufficient. Failure to follow the recommended sequence and tightening torque can cause distortion of the carrier mounting surface even when there are no visible cracks.
Consequences: Distortion of the carrier mounting surface causes vibrations that can be felt immediately after fitting when the brake pedal is pressed.
Advice: Fit another disc, following the recommended sequence and tightening torque.
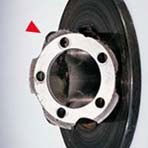
2. FAILURE TO OBSERVE THE RECOMMENDED TIGHTENING TORQUE
Description of the defect: The carrier mounting surface breaks away from the rest of the disc. There are clear signs of excessive tightening, above all in the area of the two fixing holes. This is evidence of a failure to observe the recommended torque and sequence during tightening.
Consequences: Pronounced rasping noises and absence of braking torque.
Advice: Fit another disc, following the recommended sequence and tightening torque.
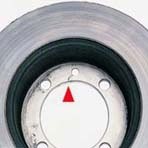
3. EXCESSIVE TIGHTENING OF THE POSITIONING BOLT
Description of the defect: The carrier mounting surface can easily distort when the disc positioning bolt is tightened too much. This excessive tightening can cause the mounting surface to break as can be seen in the photo.
Consequences: Run outing cannot be kept within an acceptable tolerance. Heavy vibrations occur during the very first kilometers following installation.
Advice: Tightening bolts are only intended to ensure that discs are positioned correctly. Do not tighten them excessively.
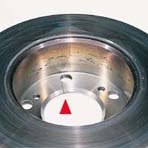
4. FITTING A DISC THAT DOES NOT CORRESPOND TO THE CAR
Description of the defect: Formation of cracks on the carrier mounting surface. Signs of a poor match between the diameter of the disc centring and that of the hub.
Consequences: Disc contact with the wheel hub is incorrect. This defective installation will immediately cause vibrations due to excessive run outing.
Advice: Check catalogues to determine the correct disc reference: model, year of manufacture. Never force discs when fitting.

5. INCORRECT ASSEMBLY OF THE CALIPER BODY ON THE AXLE
Description of defect: The braking surfaces have broken away from the hub. Asymmetrical braking surface wear can be noted: the central area of the external surface in respect of the vehicle and the outer edge of the internal surface. In this case mechanical stress has caused the disc to break and the braking surfaces have come away.
Consequences: The impact of this breakage can be felt when braking. Very loud rasping noises. Safety is compromised.
Advice: Before fitting new discs check the alignment and assembly of the caliper body on the axle.
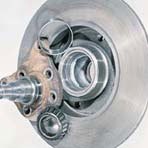
6. INCORRECT TIGHTENING OF THE DISC AND HUB BEARINGS
Description of defect: An exaggerated tightening torque knocks the bottom out of the bearing seat.
Consequences: Braking system functioning is compromised because of disc instability relative to the bearings. Strong vibrations are felt right from the first braking action.
Advice: Replace the hub, bearings and disc. Apply correct tightening torque when installing.
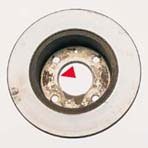
7. DIRTY HUB
Description of defect: The hub surface was not cleaned when the disc was fitted: presence of rust or dirt. Tightening against this unsuitable surface causes the new disc to run out excessively.
Consequences: This error during installation causes the onset of vibrations after a few hundred or thousand braking actions, vibrations that increase with the distance travelled. Uneven disc wear as a result of the pads causes DTV to increase - this is the origin of the vibrations - and noise.
Advice: Clean contact surfaces very carefully. Check disc run out after installation.
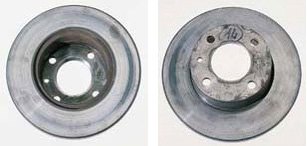
8. PRONOUNCED WHEEL HUB RUN OUT
Description of defect: Excessive hub run out causes the braking surfaces to wear as they are not parallel to the plane of the disc. Evidence of localised overheating is indicated by the darker colour of the worn areas. This is due to an alternating rubbing action of the disc and pads as a result of pronounced wheel hub run out.
Consequences: Vibrations can be felt right from the start and progressively increase. Onset of loud noises.
Advice: Check the wheel hub run out and ensure that this falls within the tolerance specified in the disc installation instructions.
- Deterioration Due to Use
-
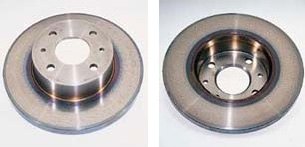
1. NO RUNNING IN
Description of defect: Disc shows colouring of varying intensity and shades (blue, violet, golden), mainly visible in the cooling areas (groove and carrier interior).
Consequences: Initial slight vibrations that progressively increase. Overheating of this type alters the mechanical characteristics of the cast iron in as much as there is a change in structure due to the formation of cementite (Fe3C).
Advice: Always advise users to observe a running in period. Brake only moderately and briefly during the first 200-300 kilometers over a mixed itinerary. Avoid prolonged pad to disc contact.
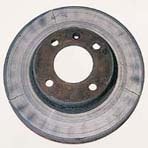
2. INTENSIVE USE
Description of defect: Disc thickness is considerably less than the recommended minimum thickness (4 mm less in total). Cracks are evident. Heat spots are visible in areas corresponding to the ventilation blades. This is advance warning that other cracks will form.
Consequences: Noises, vibrations.
Advice: This situation is typical of that found on certain sports vehicles which are subjected to an intensive and excessive use on the road.
- Excessive Wear
-
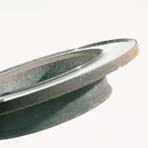
1. EXCEEDING THE LIMIT
Description of defect: The thickness of the braking surfaces measured using a micrometer is less than the recommended minimum thickness etched on the outer disc rim or on the carrier.
Consequences: Performance and comfort decreases.
Advice: Check state of disc wear periodically. The disc should be replaced after every two or three pad changes. Pads must be changed every time discs are replaced.
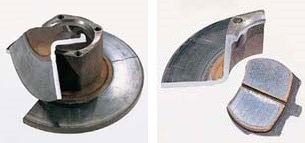
2. EXCESSIVE WEAR WITH CRACKS
Description of defect:
a. Disc
The minimum thickness indicated on the outer rim of the disc has been exceeded by more than 1 mm. Furthermore, the disc has been subjected to excessive operating temperatures as a result of the reduced braking surface thickness. This causes cracks of a thermal origin.
b. Pads
More marked wear can be noted in the central area of the disc whereas the area in correspondence with the pads is less worn. This can be attributed to the presence of hard points in the friction material, an indication that the production mixture was not homogeneous. It can also indicate poor functioning of the caliper.
Consequences: Distortion caused by vibrations during braking. In the long run cracks may form that can lead to disc breakage.
Advice: Periodically check disc wear. The disc must be replaced every two or three pad changes.
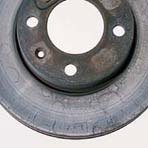
3. APPEARANCE OF CRACKS
Description of defect: The disc has been subjected to excessive operating temperatures: in the outer area of the braking surface there are evident signs of overheating. High operating temperatures lead to the appearance of cracks.
Consequences: Distortion and pad "bouncing" when hot that causes vibrations during braking. With time, cracks form and the disc may break.
Advice: The worn disc must be replaced. Check the state of wear periodically.
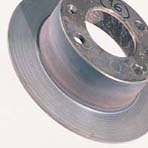
4. EXCESSIVE WEAR AND PADS COMPLETELY WORN DOWN
Description of defect: The disc is extremely worn and has been damaged by the metal pad support, the friction material of which has completely disappeared. The thickness of this disc when new was 7 mm, measured now it is 3.5 mm compared to a recommended minimum thickness of 5 mm.
Consequences: Very loud noises, very long braking distances, caliper functioning is critical.
Advice: Replace pads when they reach wear limits. Check out the pad wear warning indicator circuit.
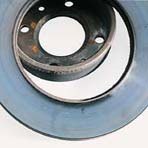
5. BREAKAGE DUE TO EXCESSIVE WEAR
Description of defect: Braking surfaces show evident signs of overheating due to the considerably reduced mass of the worn disc. This situation has caused the braking surfaces to break away from the hub.
Consequences: Violent impact during braking. A very strong rasping noise when braking. Possible safety problem.
Advice: Always check the disc thickness every time the pads are replaced. Replace the disc before it reaches its wear limit.
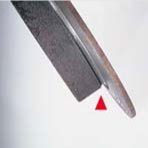
6. EXCESSIVE PAD WEAR AND MOVEMENT OF THE SUPPORT
Description of defect: Disc thickness less than the limit value. The disc has been worn by the pad support as friction material is completely absent. The metal support plate has come out of its seat in the caliper and has almost entirely cut the disc brake surface from the carrier. The braking surfaces are near to breaking away from the carrier.
Consequences: Rasping noises, loss of efficiency (considerable brake pedal slack), possible rubbing between the disc and caliper, thrust of the caliper is not symmetrical.
Advice: Check and, if necessary, repair the caliper. Replace the discs and pads.
- Deterioration Due to Other Braking System Components
-
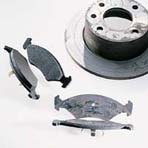
1. UNEVEN WEAR OF VARIOUS PARTS
Description of defect: A braking surface of one of the discs is in contact with the metal pad support. Examining the pads it is noted that wear is uneven due to blocking of the caliper (the pads on the other caliper are in perfect condition).
Consequences: The calipers two pads are completely worn down with consequent onset of noises and vibrations, the brake pedal has to be depressed completely. Braking distance is very long.
Advice: Check, repair or replace the caliper. Replace all discs and pads.
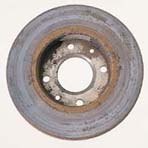
2. VITRIFIED DISC
Description of defect: Presence of a very fine deposit of friction material on the disc surface which now has a shiny finish (corrosion has then caused the detachment of part of this layer).
Consequences: Loss of braking efficiency, braking distances too long. The pedal is very stiff but with no braking action.
Advice: Replace discs and pads. Use high, original, quality pads.
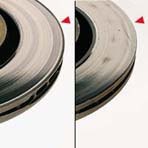
3. UNEVEN BRAKING SURFACE WEAR
Description of defect: The two pads were not positioned in the same manner with respect to the disc. Wear has not been the same for both surfaces. Heat spots can be noted at the centre of the braking surface due to high thermal exposure. The caliper and/or the pads were not fitted properly.
Consequences: Gradual onset of vibrations due to the heat spots. Possible appearance of cracks.
Advice: Check and, if necessary, repair the calipers. Check the pad model and friction material quality.
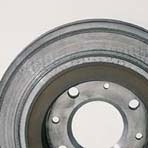
4. DEEP GROOVES AND SCORING
Description of defect: Deep scores caused by penetration of foreign bodies between pads and disc can be noted. This can be due to unsuitable pad material or the presence of badly distributed abrasives in the mixture.
Consequences: Very unpleasant noise both during braking and when travelling. Diminished efficiency as a result of the reduced contact surface between disc and pads.
Advice: Replace discs and pads.
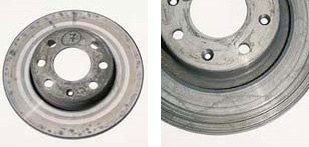
5. FRICTION MATERIAL DEPOSITS
Description of defect: The braking surfaces are completely covered by very dark spots. These spots are due to deposits of pad friction material. This causes overheating which in turn leads to a transformation of the cast iron with the formation of very hard cementite.
Consequences: Onset of vibrations that become progressively worse.
Advice: Only install friction material that is suited to the brake and vehicle.
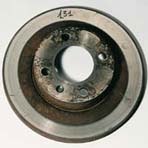
6. BRAKING SURFACES PARTLY WORN BY THE PADS
Description of defect: The braking surface only shows wear in the outer area. The inner area never comes into contact with the pads as indicated by the presence of corrosion (rust). This situation could be caused by:
- incorrect installation of the caliper and hence the pad which does not make full contact with the disc
- loss of part of the friction material • fitting of wrong pads
Consequences: Reduced braking torque. Increase in operating temperature as the surface on which the pad works is reduced (by about 50% in this example) compared to its normal working surface. There is a risk of localised overheating and therefore the onset of hot judder-type vibrations. Moreover, reduced system efficiency leads to high stress levels and therefore rapid and/or uneven wear (cold judder).
Advice: check the installation and correct functioning of the caliper. Check the fitting and condition of the pads. Check that the pad model is suitable for the particular vehicle.
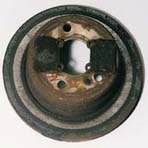
7. PARTIALLY WORN AND VITRIFIED BRAKING SURFACES
Description of defect: This disc shows a deterioration that is the sum of defects described in 2 and 6 above. In this case the pad only acts on the inner section of the braking surface. High stress has led to overheating, vitrification (deposit) and detachment of friction material.
Consequences: Progressive reduction in efficiency of the system and, when friction material detaches, total inefficiency of the system.
Advice: As for 2 and 6.
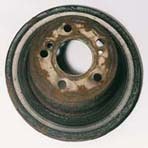
8. CURVED PADS
Description of defect: The pads only act on the central section of the braking surface. They may be curved.
Consequences Reduced braking action with the consequences described in points 6 and 7.
Advice: Check pad planarity and the functioning of the calipers.
- Changes In Disc Size Characteristics
-
When initial measurements of the fitted disc and successive observation do not give clear answers, it may be useful to analyse disc dimensions further.
Placing the disc on a bench as seen in the illustration, it is possible to measure its dimensions without these being affected by other brake components.
- After cleaning the surface coming into contact with the hub using sandpaper, the disc must be able to rest on the bench bearing without run out. This is done by holding the disc at the extremities of a diameter with the fingers and checking its vertical movement. If the disc is unstable this indicates distortion due to incorrect or excessive tightening.
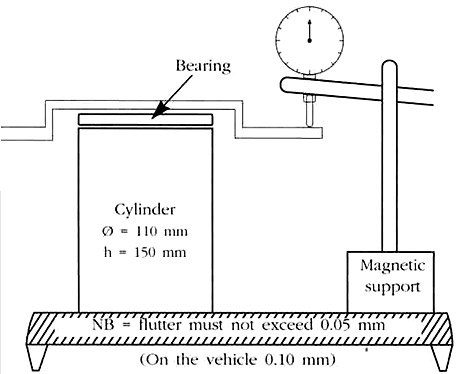
- With the aid of a DTI Gauge mounted on a fixed base it is possible to measure the discs production run out, provided that it has not been rectified by the mechanic at the time of fitting. This measurement is carried out by resting the DTI Gauge against the external or internal edge of the disc where the pads have not worn the braking surfaces. If the run out value measured is greater than 0.05 mm it means that the disc originally had a marked run out, a certain cause of vibration. If the value is less, then the acquired run out is measured by placing the point of the DTI Gauge at the centre of the braking surface: if it is beyond the tolerance this indicates incorrect installation that causes vibrations after a few thousand kilometers (cold judder due to a DTV increase).
- Lastly, when travelling, it is possible to determine if vibrations are caused by the front discs or the rear drums. Proceeding at low speed, pull lightly on the handbrake: if there are vibrations the problem concerns the rear drums (check and, if necessary, replace them).

- Brembo Advice to Users
-
- Braking style - just like driving style - must always be adapted to climatic conditions and the state of road and traffic.
- Braking distance not only depends on braking system efficiency but also on the conditions of tyres and suspension.
- Optimal braking within a limited distance is which provides maximum deceleration without locking the wheels, the consequences of which would be the loss of vehicle stability and an increase in braking distance.
- In the case of long downhill stretches it is advisable to use the engine brake and above all not to switch off the engine. After a brief stop, check pedal efficiency before starting off again.
- When the situation requires a prolonged and continuous use of the braking system, release pressure on the brake pedal from time to time for a brief period.
- After stopping for a long period the first braking actions will be affected by the stop, and also by climatic conditions. A certain number of braking actions should be performed in order to re-establish the full efficiency of the disc-pad unit.
- Ensure that all parts of the braking system function correctly: fluid level, pad and disc wear, rear brake lights, parking brake indicator, etc. Follow the manufacturers instructions as regards replacement of the brake fluid (frequency, quality).
- Periodically check the efficiency of the parking brake by trying to move the vehicle when this brake is on.
- Only use spare parts produced by recognised manufacturers.
- If possible, use a vehicle equipped with a braking control system (ABS, etc.).