
Sparco Seat Installation Instructions, Flat Version
Important. Before attempting installation verify that you have all the correct and necessary part numbers for your application. In addition to your vehicle specific bases you will also need parts numbers 00493 (sliding tracks) and 50001 (hardware kit), one each will be needed per seat. We make seat bases for many applications however this does not guarantee that every model Sparco seat will fit in a particular vehicle. Please take the necessary measurements to ensure fitment prior to installation and ask your dealer for recommendations.
Note: Motor sports are dangerous. No warranty or representation is made as to product’s ability to protect the user from any injury or death. The user assumes that risk. Sparco Motor sports’ products are legal in all 50 states for use on racing vehicles which may never be used upon a highway. Not applicable or intended for street or highway use.
- Remove existing seat assembly from vehicle. Retain bolts that fastened the original seat to the floor, they will be reused.
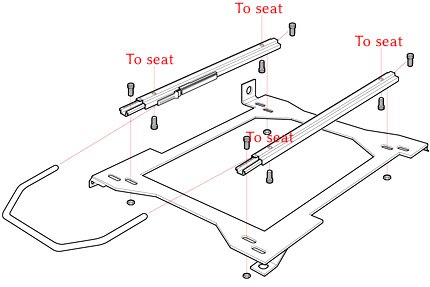
- If you will be using the stock seat belt and the receiver is attached to the stock seat, remove it and save the fastener(s) and related parts for reinstallation onto the Sparco base. In some cases you will have to source a nut for the stock seat belt receiver bolt to reuse it. Assembly (note the diagram shows a driver side base assembly facing forward).
- If you are going to use the stock seat belt, attach the stock seat belt receiver to the base using the original hardware.
- Attach the sliding tracks using the holes in the base closest to the center. The sliding tracks should be attached using a 6mm Allen wrench or Allen driver for the bolts and a standard wrench or socket for the 13mm locking nuts from kit 50001. The flat side of the sliding track should be facing the base with the release levers facing forward. Leave hardware loose until final fitment.
Tip: When installing the sliding track work on the front mounting holes first. Pull up on the release lever and slide the lower portion of the sliding track out to expose the mounting hole. Install the hardware as shown. Repeat the process for the rear mounting holes. Be sure when sliding the tracks back and forth that both tracks are at the exact same locking point/length or the sliders may bind later. Additionally, make sure the front and rear of the sliding tracks are not cocked in the slotted mounting holes in the base. This will result in the sliding track not sliding smoothly. Leave hardware loose until final fitment.
- Using the same technique outlined above attach the upper portion of the sliding tracks to the bottom of the seat using the Allen bolts from kit 50001. Leave hardware loose until final fitment.
- The finished seat assembly is now ready for test fit. Make sure the seat has all the proper alignment and clearances preferred by the driver and make marks on the base assembly if necessary. Remove the seat assembly and tighten down all loose hardware.
- Attach the “U” shaped adjustment handle to each release lever on the sliding tracks. The handle is slightly bent downward to maximize the upward travel. Be sure to install the handle so it slopes downward. Push the handle all the way down onto the levers.
Tip: be necessary to tap the handle with a rubber mallet in order to get it completely seated.
- Install the completed seat assembly to the floor of the vehicle using the original hardware.
Tip: The sliding tracks may require some breaking however if they are difficult to move or binding oosen sliding track hardware while the seat assemble is still bolted to the car and slide the unit all the way back and forth a few times to center and realign the tracks. Then retighten.