
Guide
- Selecting The Proper Vehicle Battery
- Battery Maintenance & Storage
- Battery Safety
- Cold Cranking Amps (CCA)
- Does My Motorcycle Battery Charge While I Ride?
- How To Extend The Life Of Your Motorcycle Battery
- Motorcycle Battery Jump Start Guide
- How Long Is A Motorcycle Battery’s Shelf Life?
- How To Clean Corroded Battery Terminals
- How To Activate An AGM Battery
- How To Activate A Conventional Battery
- Has Your Motorcycle Battery Gone Bad?
It’s easier than you think to buy the wrong battery for you powersports vehicle. Unless your current battery is the original equipment, you’re taking a chance by not double checking before you purchase the new battery. Here are a few general rules you should know before selectng the right vehicle battery:
Don’t Change Battery Types
* Don’t use an AGM battry in the place of a Conventonal battery unless you are sure your vehicle’s charging system can handle it
* Don’t replace an AGM battery with another battery type without checking the Yuasa Applicaton guide
Choose Performance Wisely
* When given the choice of several different batteries for your vehicle, choose the one that will best suit your performance needs
* Batteries with higher cranking amps will operate better at colder temperatures than comparable batteries with lower cranking amps (for example: YTX20HL vs YTX20L) but will often come at a higher cost. It is up to you
For Convenyonal Batteries Only
* If the battery in your vehicle is equipped with a sensor, replace the sensor at the same me you change the batteryA battery only requires a little monthly maintenance to perform perfectly. Keep the battery charged to 100%, recharging when the lights dim, the starter sounds weak, or the battery hasn’t been used in more than two weeks. Follow the simple battery storage check list below once a month:
AGM Batteries
Check voltage every 3 months (or more frequently if stored at higher temperatures
as high temperatures cause higher self-discharge rates)
*Periodically:
- Keep top of battery clean
- Check cables, clamps, and case for obvious damage or loose connections
- Clean terminals and connectors as necessary
*Recharge battery if voltage is below 12.4V.
* Once activated, the battery is permanently sealed and must never be opened. There is no need to add water to AGM batteries. Adding water to AGM batteries will result in irreparable damage to the battery or the vehicle.Conventional Batteries
*Check a minimum of once per month:
- Check electrolyte level (refill with ONLY distilled water)
- Keep top of battery clean
- Check cables, clamps, and case for obvious damage or loose connections
- Clean terminals and connectors as necessary
- Make sure the exhaust tube is free of kinks and clogs
- Replace caps firmly (finger-tight only)
*Recharge battery if voltage is below 12.48V or if the starter turns slower than usual
when starting the engine
*It is normal for the fluid levels to drop periodically during normal use, so it is CRITICAL that electrolyte level is checked regularly and topped off to the upper level line with distilled water.
- Low electrolyte levels can result in permanent damage to the batteryAny device that stores energy can be dangerous. There is a lot of explosive power in a gallon of gasoline, but when handled with some knowledge its use can be made relatively safe. Batteries are no different in that with the proper precautions and safety practices, they can be handled in a safe manner. Working with batteries poses two hazards: potentially explosive gases that are given off during discharging and charging, and sulfuric acid, which is highly corrosive. The following safety list below will help keep these two hazards under control:
No Smoking
- No smoking, sparks (from static electricity or other sources) or open flames around or near batteries
- Batteries can produce hydrogen gas that is highly flammable when combined with oxygen; if these gases ignite the battery case can rupture or explodeEye Protection
- Always wear eye protection, protective gloves and protective clothing when handling a battery
Loosen Vent Caps
- On Conventional batteries, loosen vent caps when charging and ventilate the entire charging area
- A build-up of hydrogen and oxygen levels within the battery, or in the area where its being charged, can create a fire hazard Overheating when Charging Battery
- If a battery feels hot to the touch during charging, stop charging and allow it to cool before resuming
- Excessive heat damages the plates, and a battery case that’s too hot during charging can ruptureRemove Red Sealing Cap
- On Conventional batteries, remove the red sealing cap from the vent elbow
- Never put the red sealing cap back on the battery once it is removed
- If sealing cap is left on, gas trapped inside the battery can explode
- For the same reason, make sure the vent tube isn’t kinked or blocked Connecting Battery Charger Leads Properly
- Properly connect battery charger leads to the battery: positive to positive, negative to negative
- Unplug the charger, or turn it off before connecting or disconnecting the leads
- Minimizes the chances of creating sparks when connecting or removing the leads from the batteryAcid Spills
- Clean up acid spills immediately, using a water and baking soda solution to neutralize battery acid (1 lb. baking soda in 1 gal. water)
Acid
- Make sure battery acid fill containers are clearly marked and work areas are well lighted
- If sulfuric acid is swallowed or splashed in the eyes, take immediate action
- Sulfuric acid in the eyes can cause blindness
- Diluted sulfuric acid used as electrolyte can burn the skin
- Ingesting or swallowing sulfuric acid can cause serious internal injuries or deathWhat Are Cold Cranking Amps?
Essentially, Cold Cranking Amps is an industry value to rate a batteries’ ability to start a powersports engine in cold temperatures. The numerical value refers to the number of amps a battery can produce, and sustain for 30 seconds, at a temperature of 0 degrees Fahrenheit. Depending on the climate in which you live, the CCA’s of a battery may prove to be a crucial factor in selecting the ideal Yuasa battery for your motorcycle, UTV, ATV, PWC, or other powersports vehicle.
The relationship between your motorcycle battery and engine functions much in the same way as a car battery. The alternator is fitted with a regulator that charges the battery while you ride. However, it’s important to note that normal riding may not be enough to fully charge the battery after being completely depleted. For example, if you accidentally leave your headlight on overnight and find that the battery has died in the morning, the alternator in your bike may not provide enough power to fully replenish the charge after you jump start the engine. In this case, you may need to connect your battery to an external charger/maintainer.
- Do Different Types of Bikes Provide Different Charging Power?
-
Whether your alternator can revive your dead battery largely depends on the type of motorcycle you own. Magnetic stators don’t charge at low RPMs. Your owner’s manual will tell you if a certain voltage is required in order for your alternator to begin charging your battery.
- How Can I Tell if My Motorcycle Battery is Beyond Repair?
-
The only way to know the state of your battery for certain is to use a battery tester. This accessory determines the health of your battery in a matter of seconds, so you can find out if a good charging session will do the trick, or if it’s time to purchase a replacement battery.
- Will My Alternator Charge the Battery if My Motorcycle is Running Stationary?
-
If you find that your motorcycle alternator is capable of recharging your dead battery, you will likely need to run the bike on the road in order for the alternator to work most effectively. It is recommended that you plan on returning straight to your garage after your ride, though, in case the bike refuses to start up again after being shut off. In most cases, a ride on the road is enough of a recharge for normal use. However, if the battery is deeply depleted or dead, it may not be enough of a recharge and still may not start up again after being shut off. If this happens, we recommend using a charger/maintainer to bring the battery up to a fully charged state.
Regardless of what type of motorcycle you own, every bike will have some type of alternator designed to keep your battery operating correctly while you ride. This is an important safety feature that riders rely on. But if you find that your bike has continuous issues starting up or your tester reveals that it’s time for a new battery, remember that
Yuasa batteries are the highest performing powersports batteries available. So, when it comes to replacing your battery, make sure you use Yuasa.
The longer you can keep your motorcycle battery functioning properly, the less frequently you’ll need to replace it. Not to mention the frustration that can come along with diagnosing the issue of a dead battery, the time it takes to research the type of battery you need, and the expense of frequent replacements. Luckily, there are a few tricks you can use to extend the life of your motorcycle battery, so you can spend less time worrying about your battery life and more time on the road.
Keep it Charged
The absolute best thing you can do to keep your motorcycle battery working stronger for longer is to make sure it stays charged. If you ride your motorcycle daily, the alternator should take care of charging the battery while you ride, but if you keep your bike in storage for weeks or months at a time, you’ll need to invest in a motorcycle battery charger.
Stick to a Maintenance Schedule
As with most components of your motorcycle, the battery needs maintenance too. Some
routine maintenance you can easily implement includes:- Check terminals for signs of corrosion and clean off any deterioration with a wire brush.
- For conventional batteries, check the electrolyte levels and add distilled water if the plates are not submerged.
- Test your battery’s power with a battery tester to make sure it’s functioning properly.All of these simple checks and adjustments should be done on a monthly basis and can go a
long way toward extending the life of your battery.Regulate the Temperature
Vapor loss is a normal occurrence for conventional motorcycle batteries that happens gradually over time. However, extreme shifts in temperature can expedite vapor loss, which will eventually cause the battery to stop holding its charge. Even though there’s no way to protect your motorcycle from all temperature fluctuations, storing it in a climate-controlled garage will keep your battery at a stable temperature while not in use.
For YTX, YIX, and GYZ series batteries, vapor loss is not an issue because they are sealed and the gases recombine inside the battery so that no fluid is lost from the battery. However, storing them in a climate-controlled garage will reduce self-discharge and keep the batteries at a stable temperature for reliable starting all year long.
Use the Proper Battery for Your Motorcycle
Not all bikes are created equal. Same goes for batteries. By making sure you’re using a battery that is designed to be used with your specific model of motorcycle, the better it’ll perform. We know it can be tough to know which battery is best suited for your bike, which is exactly why we created our battery finder to ensure that you know which to choose.
It’s also important to note that when it comes to motorcycle batteries, brand matters. Yuasa is the most trusted brand of motorcycle battery on the market—and has been for decades. That’s because we’ve taken all the maintenance factors into account and designed our products to combat all the usual causes of wear.
The engineering behind our products has led to improved low-temperature performance and many of our products do not require the typical maintenance you’d need with other battery brands. For instance, most of our products are designed to be airtight and spill-proof —which means they don’t require water to be added. Additionally, the corrosion-resistant nature of our products combats against rust and deterioration. All of these considerations make it one of the most maintenance-free batteries available.
If you’re searching for a motorcycle battery that offers the longest life with the least amount of maintenance, Yuasa is the best choice. All of our products are designed with real-life use in mind. When we say, “we respect the ride,” we mean that our batteries won’t stand between you and the experience of the open road. You can count on your Yuasa battery to start the first time, every time.
It is important to note, that even if you get your battery up and running again, a battery that has been too deeply depleted may continue to have issues for future starts.
You can use a digital print tester to determine the health of your battery and figure out if it needs to be replaced or simply needs a good recharge. Even though your alternator will charge the battery while the bike is running, you should test the charge status as soon as you get back to your garage in order to prevent future startup problems.
Rule Out Other Issues Before Jump Starting
There are plenty of factors that could prevent your motorcycle from starting—from carbon buildup on your spark plugs to something as simple as an empty gas tank. Make sure you go through your checklist of potential problems prior to attempting a jump start.
Some commonly overlooked start prevention culprits include:
- Kickstand Safety Mechanism– Some bikes are built with a safety feature that prevents them from starting if the kickstand is down.
- Gear Shift Safety Mechanism– In order to prevent the bike from accidentally starting while in gear, many models must be in neutral with the clutch engaged prior to starting.
- Kill Switch– Kill switches are important safety components that make it easy to shut off the bike without having to fumble with the ignition keys. Make sure it’s not the reason your bike won’t start.Once you’ve determined for certain that the battery is the reason for your troubles, it’s time for a jump start.
How to Jump Start a Motorcycle Battery
Motorcycle batteries can be jump started from another motorcycle, car battery, or portable battery jump starter. Most motorists keep jumper cables in their car, so it shouldn’t be too hard to find someone who is willing to help you out. Once you have your live battery lined up, follow these simple steps:
- Connect the positive (red) terminal on the dead battery to the positive terminal on the live battery.
- Clamp the negative (black) terminal on the live battery, but make sure you place the opposite negative clamp on a grounded and unpainted portion of your motorcycle. Typically, the chassis is suitable for this.
- Start the vehicle with the good battery.
- After a few minutes, try starting up your motorcycle. Allow it to run for a few minutes and then carefully disconnect the cables in the reverse order they were connected.
The reason it’s important to place the negative clamp a safe distance from the battery is because this connection often makes a spark and could cause a potential hazard. If your battery is a sealed Yuasa AGM battery, there’s almost no risk of fire, but keeping the negative clamp away from the battery is a good habit to get into.
Another important safety note is to make sure that the two cable ends do not touch each other. Touching the cable ends will certainly cause a spark—and if that spark reaches the hydrogen gas that is often emitted from certain types of batteries while they charge, it could cause a serious fire or even explosion. So, even though jumping a battery is a relatively simple procedure, it’s so important to always use caution and take the process seriously.
Whether you own a motorcycle shop or are simply a parts enthusiast, understanding battery shelf life will help you ensure that you get the most out of your battery. In this guide, we’ll cover how battery power becomes depleted over time and even outline some simple tricks to extend the shelf life of your battery when it’s not in use.
What Does Battery Shelf Life Mean?
Battery shelf life can refer to the battery expiration date—which is the latest date that manufacturers can guarantee the best performance from the product. Many types of batteries can continue to function perfectly fine after the expiration date has passed. However, even though batteries have a long shelf life, they won’t maintain the same effectiveness if they’ve been si?ng around for too long.
The charging power of a battery will become depleted over time, even if it’s not in use. Additionally, sealed lead acid batteries can also succumb to sulfation—which happens when the electrolyte begins to break down and stick to the lead plates to become sulfuric crystals.
Once sulfation occurs, salvaging the battery can be difficult or impossible, so it’s best to use batteries well within their recommended timespan.
What is a Self Discharge Rate?
Many people assume that batteries retain their full strength until used, but batteries do lose charge while si?ng idle. The speed at which power is depleted while not in active use called “self discharge rate.” There are many factors that can impact self discharge rate, but one of the biggest variables is simply the battery brand. The higher quality battery, the slower the discharge rate.
How to Extend Battery Shelf Life
Although time is eventually the enemy of most batteries, there are a couple tricks you can use to extend the shelf life of your batteries. The first (and simplest) method you can try is to store your batteries at a cool temperature. By storing your batteries at 50 degrees Fahrenheit or less, you can slow the aging process.
Another way to extend battery shelf life is to use a battery maintainer to keep the power level as consistent as possible. These products are specifically designed to maximize battery life and some can even prevent sulfation through a process of active desulfation.
So, How Long is the Shelf Life of a Battery?
If properly stored and maintained, most sealed lead acid batteries can sit on a shelf for about three years and should be expected to perform adequately for about another three years after they’re put into use. In order to ensure the best performance from your battery, pay attention to the date printed on the outside of the battery by the manufacturer.
If your bike has been si?ng in storage for a long period of time, you’ll need to run through your battery maintenance checklist before hittingthe road. One important element of a batittery’s function is the condition of the terminals. By learning how to clean corroded battery terminals, you can keep your battery functioning properly and extend its lifespan.
What Causes battery Corrosion?
The most common cause of battery corrosion is when hydrogen gas released from batittery acid causes a chemical reaction with the metal terminals. Corrosion typically looks like a flaky layer of white or green discoloration that sits on your battery terminals.
It’s important to note the color of the buildup that’s collected on your terminals because different colors can indicate the difference between corrosion and sulfation.
What’s the Difference Between Corrosion and Sulfation?
Although these two processes produce relatively similar-looking discharge, there are a few key differences between corrosion and sulfation.
- Corrosion occurs when hydrogen gas released from the battery acid reacts with the metal terminals. It is white or blue/green in color.
- Sulfation Test your batittery’s power with a battery tester to make sure it’s functioning properly.It is important to identify the difference between these two chemical reactions because corrosion can be easily removed as part of a regular maintenance routine, while sulfation typically indicates deeper damage to the batittery. When a battery reaches the sulfation stage, the best thing to do is replace the batittery.
Steps for Cleaning Corroded battery Terminals
Cleaning corroded battery terminals is easier than it sounds. Follow these easy steps to get your battery back into peak condition:
- Make sure your motorcycle is turned off, then you can remove the batittery.
- Use a wire brush to remove the majority of the corroded material.
- Using a rag, apply a mixture of water and baking soda. This acts as a base to neutralize acid.
- Scrub the baking soda mixture into the terminals using your wire brush. You can also use a toothbrush if you want to get more detailed.
- Wipe off any excess solution from the terminals with a rag or paper towel.
- Let your battery dry completely before reconnecting the terminals to your motorcycle.Overall, removing corrosion from your battery is an easy way to get the most out of your batittery. Complete this process after long periods of storage to ensure a complete connection between the battery and machine.
How to Prevent Motorcycle battery Sulfation
Make sure you use a battery maintainer to prevent the battery from becoming too deeply depleted over long periods of storage. This is because the lead plates that become lead sulfate during the discharge cycle are turned back into lead during the charge cycle. So if the battery is discharged too deeply without being recharged, sulfate crystals will build up and cause sulfation.
Maintaining your bike’s electrical system and keeping the terminals free of corrosion are both good ways to prevent sulfation and extend the life of your batittery. It’s also important to note that using a high-quality batittery, like any product from Yuasa’s AGM series, will provide reliable power for longer than other battery brands because the sealed,
maintenance-free design slows the release of gas and preserves the liquid inside.Whether you store your bike for long stretches of time or ride throughout the year, taking care of your battery terminals is an important part of battery maintenance. Checking in periodically on the condition of your terminals can go a long way toward improving the lifespan of your battery and provide you with a more reliable ride.
Yuasa AGM Batteries leave the factory in one of two ways: Factory Activated (FA) or Bottle Supplied (BS). Activating an AGM battery is overall very easy and differs from activating a Conventional battery. In this article, you will learn about Yuasa’s AGM Batteries and how to properly activate them in an easy 7-step process.
How Batteries Leave the Factory
Yuasa AGM Batteries leave the factory either Factory Activated or Bottle Supplied. It’s important to know the difference between the two states and what it means for your Yuasa Battery:
- Factory Activated (FA) – the battery is filled with electrolyte, sealed and charged at the factory. These batteries must be used within a period of time and cannot be stored indefinitely.
- Botte Supplied (BS) – dry AGM batteries are shipped with the electrolyte stored in a plastic container. The battery is filled with electrolyte from the container when it’s ready to be activated. AGM dry batteries have a shelf life of 5 years from the manufacturer as long as they remain sealed. Proper seal for AGM batteries means a foil sealing strip is in place on the battery without damage or flaw. Once a battery is unsealed, it should be activated, charged, and installed. The plates of an unsealed battery will begin to oxidize, making it more difficult to charge later.Activating an AGM battery (BS) is simple and differs from the activation of a Conventional battery. Non-activated AGM batteries can be stored for long periods of time as long as they are kept in a cool, dry place and out of direct sunlight. One should never remove the foil sealing strip covering the filler ports until the battery is ready to be activated. Do not use anything but the electrolyte container that comes with the battery for filling the cells as it is a higher concentration of sulfuric acid than that used in Conventional batteries. It’s also important to note that not all electrolyte containers are created equal. Typically, each container has the proper amount of electrolyte for its specific battery. Always read the
precautions and instructions on the electrolyte container before handling and filling your battery. Do not smoke when activating a battery or handling battery acid. Always wear plastic gloves and protective eye wear.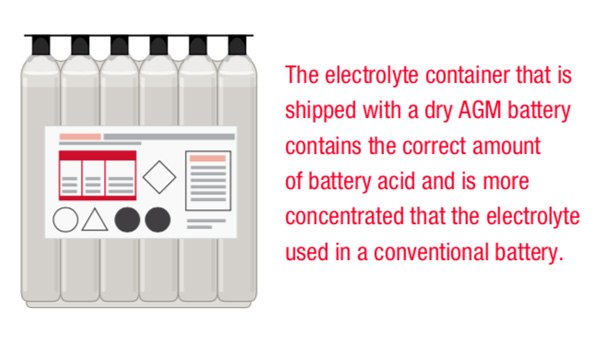
The 7-Step Process to Activate an AGM Battery:
- The battery must be out of the vehicle and sittng on a level surface.
- Remove the electrolyte container from the plastic storage bag. Remove the strip of caps and set it aside as it will be necessary later in this process. When filling your AGM battery use only the dedicated acid container that comes with the battery as it contains the proper amount of electrolyte. This is important to service life and battery performance. Do not pierce or otherwise open the foil seals on the electrolyte container. Do not attempt to separate the individual electrolyte containers.
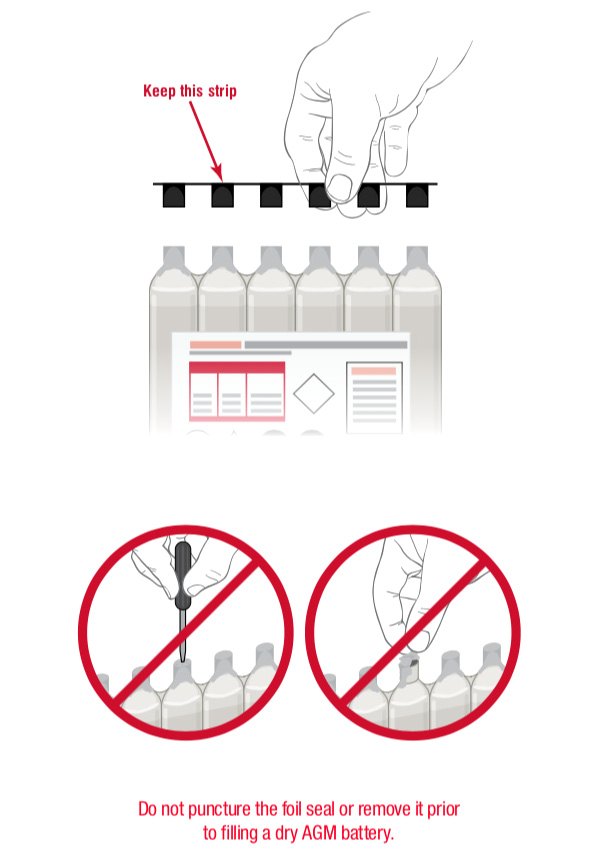
- Place the electrolyte container with the foil seals face-down into the cell filler ports on the battery. Hold the container level and push down to break the foil seals. Electrolyte will start to flow into the battery and air bubbles will be seen inside the container. Do not tilt the electrolyte container.
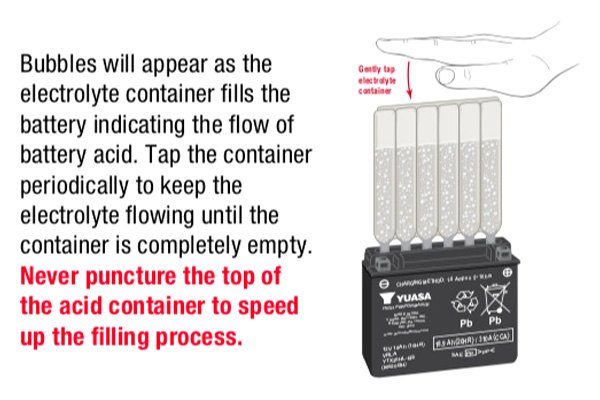
- Check the electrolyte flow. Keep the container in place for 20 minutes or longer until it empties completely. If no air bubbles are coming up from the filler ports or if the container cells haven’t emptied completely after 20 minutes, then tap the container and/or battery case gently a few times to cause the electrolyte to flow into the battery. Do not remove the acid container from the battery until it is completely empty. The battery requires the entire electrolyte from the container for proper operation.
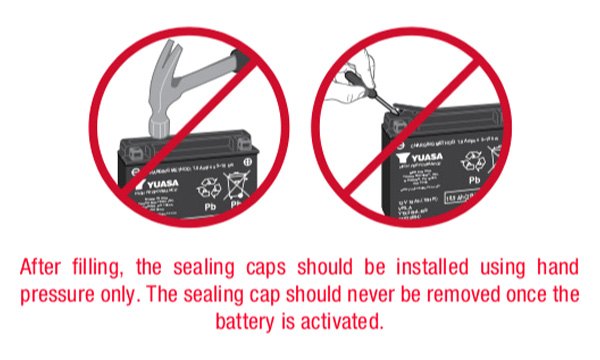
- Carefully remove the empty electrolyte container from the battery. Fully insert the strip of sealing caps (previously removed from the electrolyte container) into the battery filling ports. Make sure the strip of caps is fully inserted and flush with the top of the battery. Insert the caps by hand, do not use a hammer or excessive force. Never remove the strip of caps or add water or electrolyte to the battery during its service life.
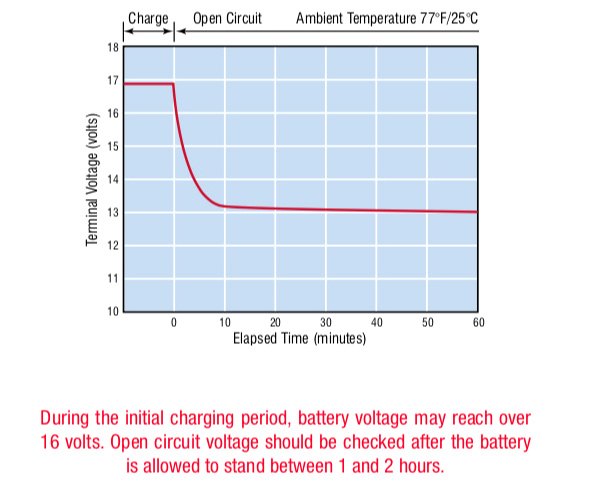
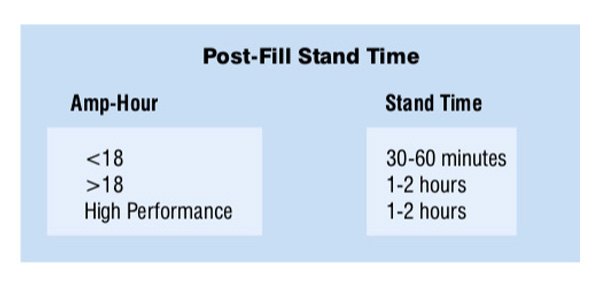
- For batteries with ratings of less than 18 AH, let the battery stand for 20 to 60 minutes. For batteries with higher AH ratings or having the High Performance rating (designated by an “H” in the part number/name), allow the battery to stand for 1 to 2 hours. Yuasa AGM batteries have amp hour (AH) printed on the front of the battery case. The stand or rest period allows the electrolyte to permeate into the plates for optimum performance.
- Newly activated AGM batteries require an initial charge. After adding electrolyte, a new battery is approximately 75-80% charged. After the “stand” period described in step 6, charge the battery to bring it to a full state-of-charge. The battery charger used for initial charging should be able to charge at 12.8+ volts for an AGM battery. All Yuasa battery chargers are capable of reaching this minimum voltage and initializing/activating an AGM battery.
Activating a Yuasa AGM Battery is a simple, 7-step process that nearly any rider or mechanic can follow with success. Remember to always practice caution when handling batteries and activation equipment.
Yuasa batteries leave the factory in one of two ways: Factory Activated (FA) or Bottle Supplied (BS). Activating a Conventional battery is overall very easy and differs from activating an AGM battery. In this article, you will learn about Yuasa batteries and how to properly activate them in just a few steps.
How Conventional Batteries Leave the Factory
Yuasa Conventional battery leaves the factory as Bottle Supplied (BS):
- Bottle Supplied (BS) – dry Conventional batteries are shipped with the electrolyte stored in a plastic container. The battery is filled with electrolyte from the container when it’s ready to be activated. Conventional batteries have a shelf life of 2 years from the manufacturer as long as they remain sealed. Proper seal for Conventional batteries means filler caps and a red vent caps are installed and stored at room temperature. Once a battery is unsealed, it should be activated, charged, and installed. The cell plates of an unsealed, uncharged battery will begin to oxidize, making it more difficult to charge later.
The Process to Activate a Conventional Battery
- The battery must be out of the vehicle and placed on a level surface. Remove the filling caps (red, yellow, or green colored battery caps).
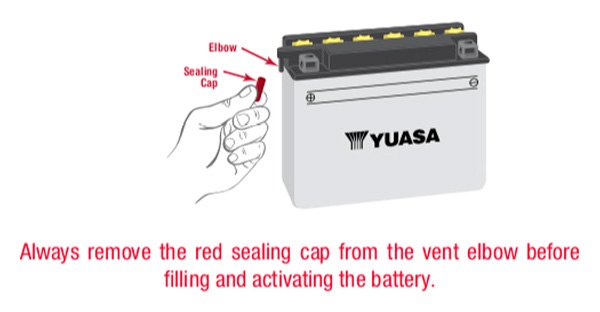
- Remove the red sealing cap from the vent elbow. If the battery has a red cap on the vent elbow, remove it and throw it away. Never put this cap back on the battery after it is filled with acid as the buildup of internal gas pressure can cause the battery case to rupture.
- Using the acid bottle supplied with the battery, place the container upright on a flat surface. Carefully cut off the tip of the bottle’s spout and attach the short tube provided. Caution: Do not squeeze the bottle when cuttng the fill tip. Do not smoke when activating a battery or handling battery acid. Always wear plastic gloves and protective eye wear.
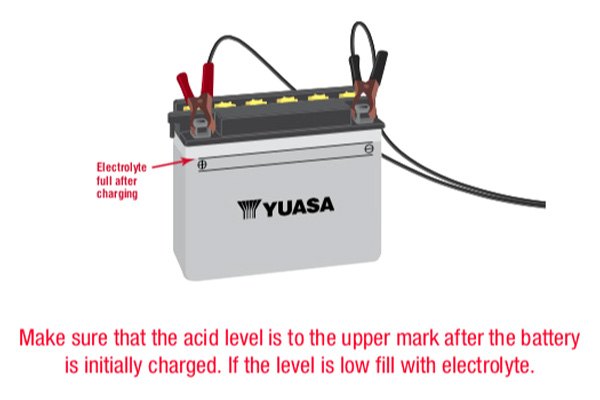
- Fill the battery with the electrolyte supplied with the battery. Do not use water or any other liquid to activate a battery. Electrolyte should be between 60 and 86 degrees Fahrenheit before filling. If electrolyte is stored in a cold area, it should be warmed to room temperature before filling. Fill to the UPPER LEVEL as indicated on the battery. Note: Never fill/activate a battery installed in a vehicle as electrolyte spillage can cause damage.
- Fill each battery cell slowly and carefully to the highest level line.
- Let the battery stand for at least 30 minutes after filling. Move or gently tap the battery so that any air bubbles between the plates will be expelled. If the acid level has fallen, refill with acid to the upper level.
- Filling a Conventional battery with electrolyte will bring it to a 75-80% charge. A battery must be charged to 100% before puttng it into service. To find recommended charging current requirements in amps for a specific battery, divide the battery ampere-hour capacity rating by 10. For example: a 14 AH battery should be charged at 1.4 amps (14 AH ÷ 10 = 1.4 amps). The specific gravity of the electrolyte should rise to at least 1.260 on 12N series batteries. On all High Performance batteries (YB Series) a minimal reading of 1.280 should be observed.
- During initial charging, check to see if the electrolyte level has fallen, and if so, fill the battery with acid to the UPPER LEVEL. After adding acid, charge for another hour at the same rate as above to mix the water and acid together. Note: This is the last time electrolyte should be added to the battery. If the level is low during use, distilled water should be added as required.
- When charging is complete, replace the filler cap plugs and tighten them by hand – do not use a screwdriver or pliers. Wash off spilled acid with water and baking soda solution, paying particular attention that any acid is washed off the terminals. Dry the battery case and install the battery.
Activating a Conventional battery is a simple process that nearly any rider or mechanic can follow with success. Remember to always practice caution when handling batteries and activation equipment.
Batteries are not eternal. Even the best quality battery has a maximum life expectancy. That’s because batteries are essentially boxes of chemicals and chemicals lose potency over time.
Difference Between a Dead Battery and a Bad Battery
Almost everyone has left their headlights on all night at some point. This slow draw of energy without the ability to recharge from the alternator is sure to drain the battery and cause it to “die.” In most cases, dead batteries can be revived by a jump start. The same is not true for a “bad” battery.
When a battery goes bad, there is no way to revive it. No matter how much you charge it, a bad battery won’t hold a charge.
Rule Out Other Potential Causes
The first step in any mechanical diagnosis is to rule out all the potential causes of the problem. If your battery is less than three years old, has never gone uncharged for a long period of time, and doesn’t show any visual signs of damage, there may be other reasons your bike won’t start.
Before you invest in a new battery, inspect the wiring, check if terminal connections are loose or corroded.… you may even want to have your motorcycle professionally inspected to make sure it’s not an issue with your alternator or another mechanical component. Remember that many modern motorcycles are ou?itted with a safety feature that prevents
the bike from starting if the transmission is in gear and the clutch is not engaged, so always make sure you have the proper conditions to start your bike.Visual Inspection
Some of the most obvious signs of a bad battery are visual indications. These include: a broken terminal, a crack or bulge in the plastic casing, as well as any leaking or discoloration. Sometimes, battery terminals can become corroded. In most cases, it’s possible to clean corroded battery terminals and continue using your battery, so make sure any signs of wear or discoloration are not a result of normal corrosion before you deem your battery “bad.”
Battery Testing
The surefire way to determine the health of your battery is to use a battery tester. A professional quality tester will be designed specifically for powersports batteries and provide recommended actions.
If your battery is indeed bad, the only solution is to replace it. Don’t choose just any replacement battery. Any time you need to purchase a replacement part for your motorcycle, it’s best to select a reputable brand so you don’t face the same issue again for a very long time. Yuasa batteries are the number one choice of motorcycle manufacturers worldwide, because the quality and longevity of Yuasa batteries far exceeds that of its competitors. So next time you need to replace your motorcycle battery, choose Yuasa.